Combat - Boot Camp

In order to have combat a tank must 'attack' or shoot an enemy vehicle.  If there is a direct line of sight it can fire its weapons at the enemy tank.  Besides a line of sight the distance
must be such that target is within range and can be seen. If these are all true then go through the shooting process.

1.  First measure the range to the target vehicle.  Measure from the turret (or roof edge) of the shooting vehicle to turret edge of the enemy vehicle.  Measure the distance in millimeters.
2.  Check the gun table for this particular gun.  The range listed is the 'up to' number.  So if the range measured is say 430mm then the column to use on gun range must be equal or greater than this.
The number listed is the base to-hit number.  This number plus any adjustments is what must be rolled on a D10,  One D10 is rolled per gun shooting at a target per segment.
Example: If the target is at 430mm away and the gun firing is a 75mm/70 gun the range column to use would be the 550 So for targets up to 550mm the base to-hit number to be rolled is a 3.

There usually are other circumstances that cause the number to be higher.
If for example it is the first time firing at this target then there is a +1 added to the needed score.  Or, the target moved there is a +1 added to the needed score.  If it is in woods then there is a +2 added.  If the shooting tank was moving a full movement

After consulting the table for the required to-hit number roll a single D10 for each shooting tank.  If the required number is made then a hit is scored on the

The above is part of the German 75mm/70 gun table, the gun on the Panther tank.  The row titled 'To Hit' lists the numbers needed to score a hit.  The first number and biggest number is the base to-hit number.   The smaller numbers separated by dots are the number needed for two or three hits.  Looking at the column listed 3.7.11 with 550 listed under it in the 'Range' row.  This means if a 3 was need for one hit, then a '7' is needed to get two hits and '11' is needed

during the turn there is a +3 added to the score.   All these circumstances must be taken into account and the added numbers totaled to sum.   This sum then becomes the to-hit number.  The Direct Fire To Hit Modifiers table lists all the circumstances and the number that must be added because of each.
Usually the first shots at an enemy will be at substantial ranges and high numbers will be the to-hit number.  Sometimes this number may be greater than 10.  If the number is greater than 10 a die roll of '10' is required first.  If this is attained then a 'backup' or second roll is needed.   This number must be at least a '6' before it gets to total over 10.  A backup roll of '6' is an 11 while another 10 is a 15.

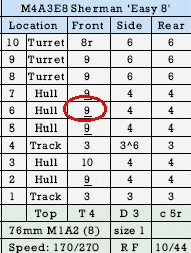
If a hit is scored on the enemy tank a D10 is rolled by the shooting player on the whereabouts on the vehicle the shot lands.  The higher numbers tend to be the upper part of the tank while the smaller numbers the lower parts of the tank.  Each armored vehicle will have its own tank data table.   Listed would be its armor on the front, side and rear at 10 main locations.  Also a listing of the armor on the top turret and top hull (over the engine).  Even cupola armor (if any) is listed.
Usually location '1' and '4' are track locations while 8, 9 or 10 are turret locations.  The what is left is the hull.  Sometimes tanks will have turrets of greater area and location 7 will also be a turret location.  It is important to read each table carefully as some have subtle differences.

The next step is to compare the armor of the target tank at the location hit with the penetration of the shell that hit it.  Cross-reference the range to the target with the penetration.  If we use the above example where the range is 430 then the penetration is the column that is equal or above this, namely the '500' column.  We see by the image that this is 14.
So if an Sherman 'Easy 8' was the target and the location hit was location '6' then the shell should penetrate.   Not so fast.   Its not that easy.  There is another die roll

Tank table for a Sherman M4 'Easy 8'.  Location 6 on the front has 9 underline armor.  The underline means it is highly sloped

to make first.   This is a variable penetration roll.   You see tanks aren't always parked at right angles to the shooting tanks.  They could be turning and at different angles from second to second.  They aren't always on an absolutely flat parking lot.   They may be on sloped ground or going over undulating ground and are at a different tilt second to second.  Also, shells don't always penetrate the same amount.  So to take in all the possible factors that could degrade the shell penetration we roll a D6 and modify the listed or maximum penetration.

There is a table for this.  It is called the Variable Penetration Table.  Actually there are several of these for different types of shells.  In this case the shell fired was APHE.  If we roll a D6 to see what our variable is.  The roll is a '3'.  The table says that we subtract 3 from the maximum (14) giving 11 actual penetration.  Now this is greater or equal to the armor so the tank is penetrated in the hull.

Sometimes the armor will have notes on it.  There is an 'r'.   This means the armor is highly rounded.  This may help the armor ricochet the shell.  Subtract '1' from the variable penetration die roll.

Other notes for underlined armor or spaced armor.   
Underlined armor means it is sloped 45° or more.   While armor slope is computed in all the armor values, highly sloped armor deflects some shell types significantly more than others.
Spaced armor helps protect against HEAT warheads and shells.