|
Battle at Fontenay and Rauray |
||

|
The battle began for the village of Fortenay. Stuart Hills' book tells us the first attempt to take this from the Germans was rebuffed in an all day battle June 25th. It was again assaulted in the evening with fresh troops and finally taken around midnight. The photographer accompanied the British forces and took a number of photographs and film clips now on the Imperial War Museum website. (Some are not accessible but the description can be found.) The next day |
||
|
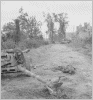
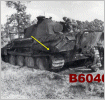
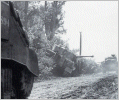
"In Fontenay itself, a 7.5cm anti-tank gun covering the Caen-Juvigny road has been overrun, with one of its gunners lying dead nearby, while further down the road can be seen a burnt-out Sherman tank and a smoldering Panther Ausf G tank, which the cameraman examines in detail." IWM |
||
|
B Squadron took the lead crossing an open field while C Squadron took the St. Nicolas farm from the rear. In support of this tank company was the 55th Anti-Tank Regiment of Royal Artillery. This unit contained M10 Achilles [17-pounder armed] self-propelled guns plus numerous 6-pounder and 17-pounder anti-tank guns. [The Loyd carrier while armored in the front and sides was not meant to be a combat vehicle like the Universal or Bren gun carriers.] I haven't found any Loyd carriers towing a 17-pounder while it has more horse power than the Morris Quad. Hills' book doesn't mention any losses to this unit but the captions of the IWM does. |
||


|
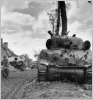
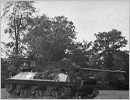
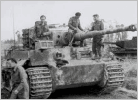
Above left: " Nearby lies a wrecked Hitlerjugend Panther tank; In the background can be seen a knocked out M10 Achilles 55th Anti-Tank Regiment Royal Artillery self-propelled gun." IWM |
||
|
There may be additional photos out there somewhere of scenes from the battle but I haven't found them yet. Or at least identified them. The IWM captions would read: |
||
|
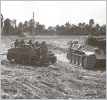
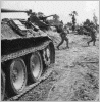
Photo to the left may be the two 4/7th Dragoon Guard tanks that cautiously advance towards Rauray past an abandoned 501st SS Heavy Tank Battalion Tiger tank. In the mean time there are a number of Lyod carriers and infantry standing around un-cautiously just past the Tiger tank. |
||

|
One of the Battalion's Loyd Carriers and two 17-pounder guns from the 49th (West Riding) Division's anti-tank unit, the 55th Anti-Tank Regiment Royal Artillery, dash by during a lull in the shelling. |
||
|
Right: The camera examines the Tiger's Zimmerit-clad superstructure, the "Leibstandarte SS Adolf Hitler" emblem on its front plate and the numerous armour- piercing shot scars on its bow armour. Six 'A' Squadron tank crewmen hitch a ride on the vehicle. |
||
|
That the first Tiger is pictured driving north on the Ruaray road by the British right near the Panther is a little concerning. Unless the captors drove it up and down the road for amusement it should be heading just in one direction and that is north from where it was captured. That would mean the point would be much more to the south than the Panther. In turn that means it would be closer to Ruaray than any of the places we so far identified at which it was engaged. Right now I haven't looked into where that might be. |
||
|
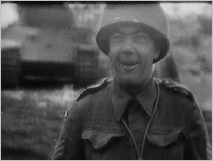
Above: Sergeant Christie poses before the wrecked Panther. |
||
|
Note - The British call Rauray the 'Rauray Spur' which apparently hasn't anything to do with a rail line but is taken from a geographic feature. |
||